it just occurred to me that darth vader, master engineer, probably looked at the death star plans at some point and noticed the flaw, but didn’t bother to tell anyone about it because he despised everyone who was involved in the project
Happy Sunday, everyone! And, thank you for 1000 followers 🙂 I promised I’d write up a new post for those of you who just started following me, so enjoy this video of one of my black sex-link hens, the Queen, being cute and dust-bathing in the sun.
I think everyone here on birdblr loves to watch their birbs bathe, whether it’s done in water or a nice patch of dirt. Some bird species have no problem bathing in either, but most, if not all gallinaceous birds (poultry, including chickens and quails) will only dustbathe. Why do they do it – how does rolling around in dirt keep you clean?
The most common answer people will give you is that dustbathing keeps ectoparasites – mites and lice – off a chicken’s skin and feathers. While this has been common knowledge among both chicken farmers and backyard chicken owners for decades, you might be surprised to learn that no one ever actually tested this scientifically until 2012. There are possibly hundreds of studies which basically tell us that dry dirt or sand is just like dry shampoo for the birds, absorbing excess oil from their feathers, and removing it once the dust is shaken, or “roused” out. Certain species of avian mites and lice feed primarily on the oil, so it was believed that regularly removing it would leave the parasites without a food source, if the physical movements involved in dustbathing behaviour didn’t dislodge them first. Martin and Mullens were the first researchers to actually test and support the hypothesis that dustbathing behaviour evolved, at least in part, specifically for the purpose of reducing the number of parasites on a bird’s body. Their work also showed that sulfur, which is among one of the many naturally occurring elements in dirt, plays a big role in keeping parasites away by killing them through direct contact and possibly fumigation. So, there is solid evidence that dustbathing helps with parasite control, although no one ever really bothered looking into it, for some reason.
What was more commonly studied was the effect of dustbathing on a chicken’s feathers. By removing all of that excess oil, down feathers in particular become fluffier as a result (side note: this is also one of the few instances where the word “fluffy” is used in a scientific paper). This increases the overall insulation ability of the plumage, and hens housed on an appropriate dustbathing substrate have been shown to have lower temperatures on their backs (important for keeping cool on hot days like today!).
Here’s the not-so-cute, kinda depressing part of this post. We know that dustbathing has all these hygiene-related benefits for the birds. So why are hens kept on commercial egg farms (note: I’m only speaking based on current Canadian poultry industry practices) not given anything to dustbathe on? Generally, commercial birds who never get the chance to go outside don’t become exposed to ectoparasites, which most farmers are only concerned about because they can cause a hen to lay fewer eggs per year. Barring that, it’s argued that there just isn’t any other reason to give hens a chance to dustbathe. That’s where animal welfare researchers come in (and that’s why I love my job). In the last few decades, there have been a plethora of studies showing that hens kept in wire cages will “sham” dustbathe, or perform dustbathing behaviours when there is no dust to begin with. At that point, the behaviour becomes labelled as “abnormal”, indicating that the animal has some need that is not being met. Other studies have demonstrated numerically how much work a hen will put in to dustbathe – for example, some experiments involve hens learning to push through heavy doors (up to a certain percent of their own body weight) just to access a pan of peat to dustbathe in. Finally, a fascinating study done very recently showed that dustbathing quail had a higher tendency of exhibiting possible facial indicators of positive emotions (i.e. dustbathing birb = birb with poofier face = possibly happy birb). With such a large body of solid, scientific evidence to support a significant emotional significance of expressing proper dustbathing behaviour in birds (I don’t know about you, but there are days when a nice bath/shower is more about stress relief and self-care than just keeping clean), researchers have been able to effectively argue for providing dustbathing opportunities to commercial laying hens. In Canada, battery cages will be banned from all egg farms by 2036, and replaced by “enriched housing”, which will be required to include, among other things, a small area for dustbathing behaviour.
So, while it may sound annoying at times when researchers like me say things like “there is/isn’t any scientific evidence for x”, the reason we need to look for that solid evidence is that it’s the only thing that industries and the public will listen to, and often it’s the only thing that can bring about positive (but small) change!
References:
Bertin A, Cornilleau F, Lemarchand J, Boissy A, Leterrier C, Nowak R, Calandreau L, Blache MC, Boivin X, Arnould C, Lansade L. Are there facial indicators of positive emotions in birds? A first exploration in Japanese quail. Behavioural processes. 2018 Jun 30.
Martin CD, Mullens BA. Housing and dustbathing effects on northern fowl mites (Ornithonyssus sylviarum) and chicken body lice (Menacanthus stramineus) on hens. Medical and veterinary entomology. 2012 Sep;26(3):323-33.
Van Liere DW, Bokma S. Short-term feather maintenance as a function of dust-bathing in laying hens. Applied Animal Behaviour Science. 1987 Aug 1;18(2):197-204.
Wichman A, Keeling LJ. Hens are motivated to dustbathe in peat irrespective of being reared with or without a suitable dustbathing substrate. Animal behaviour. 2008 Apr 1;75(4):1525-33.
If you are running a game with pirates in it, then you should know
what the job entails. It’s not all boarding ships, counting booty, and
drinking rum like you might think. A great deal of hard work is required
to run a sailing ship with a law-abiding crew, let alone one populated
by pirates. In this essay we are going to examine the five principle
officers on board a pirate ship, their duties, and their
responsibilities. This is part one of a three part lesson. In the next
lesson we will examine the duties and responsibilities of other officers
and crew members with special duties. In the final lesson, we will look
at one very special group of crew members that are almost always
overlooked. Read on to learn what pirates expected of their primary
officers.
The principal officers of a pirate ship were the captain, the
quartermaster, the pilot, the boatswain, and the master gunner. On some
ships these positions were all elected by an equal vote of the crew and
on others the captain picked the crew members he wanted to serve in the
positions. The captain on a pirate vessel was almost always elected by
an equal vote of the crew. On a privateer vessel this was not very often
the case. Privateer captains were often the owners of the ship or were
given commission by their monarch to take a vessel to sea. So it follows
with the other officers. If the captain was elected, then generally all
of the officers were elected. If the captain was appointed or held his
position by means of ownership, then generally he picked the officers.
In either case, an officer on a pirate ship served at the whim of the
crew. Even a man picked by the captain would be booted down to a simple
crewman if he could not do his job. For the most part though, a person
elevated to serve as one of the principle officers did so for life. The
title of this article refers to the fact that most often the authorities
that captured, tried, and hung pirates concentrated on the five
principle officers of the ship. These officers were generally the most
intelligent and skilled crewmen on board the pirate vessel. They were
people that everyone else on board the ship admired for their ability to
do their job. Diligent action is the mother of respect on board a ship.
Captain
The captain, however he came to his position, was chosen for his
leadership, bravery, and cunning. The captain was responsible for the
ship and everything aboard her; every item and every man. He was
responsible for the overall decisions affecting the ship and her crew.
The captain decided where to sail and what to attack. He was the voice
of his crew to all beyond the ship. He often led his crew in battle. In
terms of daily duties, the captain kept a log of the voyage, managed the
affairs of the ship through the officers, and generally served a four
to six hour shift at the helm. The captain stayed in power by being
successful. As long as there are prizes to plunder, rum to drink, and
food to eat, the captain will not be voted out or mutinied against. It
is when things get lean that the captain must worry about crew voting
him unfit for command.
Quartermaster
The quartermaster (or first mate on a privateer vessel) was the
number two man on the ship. He was responsible for enforcing the ship’s
articles and administering punishment when necessary. The quartermaster
was the trustee of the ship and her crew. He directly represented the
crew to the captain. It was his responsibility to serve as a
counterbalance to the captain in decisions that might be hazardous to
the ship or the crew. A wise captain made no decisions that his first
mate didn’t support. The quartermaster took responsibility for prize
vessels and picked the treasure that the crew would take from a prize.
He was also responsible for counting the booty and splitting the shares.
Each day would find him working with his subordinate officers the
boatswain, the master gunner, and the master at arms to effectively run
the ship. The first mate also served a turn at the helm, generally a
four to six hour shift.
Pilot
The pilot was the number three man on the ship and often the most
educated. He served as the ship’s navigator and was generally the best
all around sailor aboard the ship. He was responsible for plotting the
ship’s course and maintaining that course. The pilot maintained all of
the ship’s charts and maps as well as the tools of navigation. He was
charged with keeping a daily log of every event relating to the sailing
of the ship. He recorded the depth, the currents, the wind patterns, the
ship’s location, the locations of reefs and sandbars, and the state of
the rigging. He reported directly to the captain. The pilot oversaw the
work of the sail-master and almost always had at least one assistant (a
pilot’s mate) to help him with his duties. The pilot and his mate both
served separate shifts at the helm in addition to taking readings from
the moon and stars to plot and maintain the course.
Boatswain
The boatswain was the number four man on the ship and often the most
feared by the crew. He was in charge of the provisions for the ship. He
maintained the stores of food, water, rum, gunpowder, shot, sails, rope,
wood, and tar required to keep the ship and crew fit for action. The
boatswain also directed the loading of cargo into the hold to maintain
the proper ballast to ensure level sailing. He was in charge of keeping
the watches on the ship and maintaining discipline among the deck crew.
He was responsible for the ship’s longboats and for picking a crew to
man the sweeps when the longboats were used. The boatswain was charged
with maintaining the ship’s seaworthy status. He oversaw the duties of
both the carpenter and the cook. The boatswain generally had a mate to
help him with his responsibilities. In general, his duties were to make
certain that all the work of running the ship was done. He reported to
the quartermaster. The Boatswain was often the most feared man on the
ship because his obligations often made him uncompromising. It was his
responsibility to keep everything “ship-shape”. Leniency was something
the quartermaster might give to the crew, but it was not something the
boatswain was in the position to give. Day and night, the boatswain
would drive the crew to do whatever work was required. He maintained the
watch log and reported any problems to the quartermaster.
Master Gunner
The master gunner was the number five man on the ship. He was
responsible for the care and cleaning of all firearms, culverin (deck
guns), and cannons on board the ship. He was also responsible for
training the crew in the use of both firearms and ship’s weaponry. The
master gunner picked and ran the gunnery crew. He reported to the
quartermaster, but was responsible to the entire ship to make certain
that the cannons hit the declared target. He was also responsible for
maintaining the inventory of powder and shot for all of the guns on the
ship. The master gunner was the only crew member besides the captain and
the quartermaster entrusted to carry a key to the ship’s powder
magazine. Additionally, the master gunner often led or picked hunting
parties when they were called for. His day to day duties mainly
consisted of drilling the gunnery crew and maintaining the guns.
The Next in Line to Hang – More Roles on a Pirate Ship
In this second part of a three part lesson dealing with the crew
positions aboard a pirate vessel, we are going to look at the
responsibilities of the Sail-master, the Carpenter, the Cook, the
Surgeon, and the Master at Arms. These were all lower officer positions
and were either voted upon or assigned by the captain as discussed in
the first part of this lesson. The sailors who served in these positions
were skilled laborers and, as such, their skills were always very much
in demand on a ship. They were almost always offered a greater share of
the treasure because of their skills. These were definitely crew members
that a pirate ship could not function without.
Sail-master
The Sail-master was the most experienced crewman in the rigging and
usually one of the best sailors on the ship. He was responsible for
maintaining the sails and the rigging. The Sail-master knew every knot,
line, rope, block and tackle in the rigging as well as how to repair
them all. He was also responsible for training and running the sail crew
as well as overseeing the making and patching of sails. The Sail-master
took orders from and reported to the pilot.
Carpenter
The Carpenter was a skilled wood worker, often with some shipwright
experience, who did all of the woodworking required by the crew. He was
primarily responsible for repairing damage to the wooden portions of the
ship and for plugging leaks that got too bad. (Ye should understand
right now, before ye go to sea, that all ships leak, mates. It’s just
when they really leak badly that you have to worry about it.) The
Carpenter was also responsible for the construction of barrels and
crates, as needed, to store cargo, as well as maintaining the tools of
his trade. He took orders from and reported to the Boatswain.
Cook
The Cook was one of the most important of the lower officers. He was
in charge of all matters relating to food on the ship. He made certain
there was enough food, water, and rum on board for the planned cruise.
He cooked the meals and suggested rationing when it was necessary. The
Cook butchered the meat brought back by hunting parties and was the only
man trusted to light a fire below decks. He maintained the necessary
tools for both cooking and butchering. The Cook took orders from and
reported to the Boatswain.
Surgeon
The Surgeon was likely one of the toughest men on the ship. He served
as the barber/doctor/emergency surgeon for the entire crew. He was
equally capable of shaving your beard and cutting off your damaged leg.
The Surgeon dealt with not only the sick and the wounded, but also the
dead. He, like the other lower officers, was responsible for maintaining
the necessary tools of his trade. The Surgeon took his orders from and
reported to the Quartermaster. It was rare for a ship to have a real
doctor and it was common for the carpenter or the cook to fill this role
as needed.
Master at Arms
The Master at Arms was often the most skilled warrior on the crew. He
was responsible for training the crew in hand to hand combat. He also
led the ship’s boarding parties and hunting parties when they were
necessary. The Master at Arms position was not a separate position on
every vessel and often these responsibilities fell to the Quartermaster.
When the Master at Arms position was filled on a ship, he took orders
from and reported to the Quartermaster.
These 5 core positions represent the Non-Commissioned Officers of a
pirate or privateer ship. These men all commanded other men on work
details and so their words carried great sway with the crew. It was
often from among these men that the next captain was chosen when a
captain lost his position through a vote of no confidence. Thus, these
were the men that the captain had to keep loyal to him to stay in
command of the ship.
And Hang the Musikers, Too – Even More Roles on a Pirate Ship
In this article, we will be looking at the makeup of the crew itself.
Remember that the only rule with pirates is that there are no rules; no
two crews of any two pirate ships were exactly the same. Even so, we
can narrow down some roles common to pirate/privateer crews based upon
the jobs that must be done aboard ship. Most simply put, pirate crews
are a mixture of brutes, gunners, swabbies, and musikers. Let’s examine
each category in turn.
Brutes
A great deal of hard work and heavy hauling is involved in just
sailing a tall-masted ship. In strong winds the canvas sails must be
man-handled by a deck crew that is stronger. Loading and unloading
supplies, most especially cannons or chests of gold, requires a number
of strong backs. This is why every ship has its share of brutes – big,
strong men capable of handling themselves no matter the work or the
fight. In addition to the tasks already mentioned, brutes would be key
men in hunting parties, ship boarding, and raiding groups as well. Keep
in mind that not all brutes need to be hulking bruisers. A wiry-tough
and dexterous hunter, skilled with both blades and long rifle, could be a
brute as well. Brutes, no matter their size, do not shrink from a hard
task. Men of this sort make up perhaps as much as ½ of a pirate crew,
but they will be mixed among the gunners and swabbies, not a stand alone
corp. Most of the men on a pirate or privateer ship were probably
gunners.
Gunners
Depending upon the size of their shot, each cannon required a crew of
either 3 or 4 men to load and fire it. So a sloop carrying 4 small guns
per side would require a minimum of 24 men to fully maintain them and
that does not include the officers directing the cannon fire. On a large
ship, like Blackbeard’s Queen Anne’s Revenge, a full gun crew would be 160 men dedicated only to firing the cannons. (It is
important to note here that Blackbeard had a total crew compliment of
125 on board the Queen Anne’s Revenge.) These crewmen would
have to be available 24/7 to do their job whenever required, but
otherwise might have no duties on the ship. There was double-duty in
most crews though. Most pirate ships didn’t keep a full compliment of
gunners like warships of the time did because fewer crew members meant
fewer shares and that meant more money for everyone when the treasure
was split. Gunners could make up between 1/3 to 2/3 of a crew.
Swabbies
Swabbies, or actual trained sailors, are the crew members responsible
for handling the rigging and the sails to keep the ship moving. These
are the guys and gals who climb the ratlines into the rigging and walk
the spars that jut from the masts. Swabbies sometimes fight from the
highest position that they can get to on their own ship and then leap
into the rigging of the enemy vessel when boarding. Often dexterous
fighters, swabbies are known for leaping into the fray, but sometimes
they hide in the rigging as deadly snipers. It might be surprising to
discover that skilled sailors usually comprised less than 1/3 of the
total crew compliment of the ship.
Musikers
It is difficult to prove that “musikers”, or musicians as we call
them, were ever a stand-alone part of a pirate crew. However, two
excellent examples from the pirate period demonstrate that they have
been a common part of most ships of war, pirate and privateer ships
included. The first example is from the early Seventeenth century. In
Captain John Smith’s advice concerning how to conduct a one-on-one naval
engagement he remarks when preparing to board one should, “… sound
Drums and Trumpets, and Saint George for England.” The second example
comes from the early Eighteenth century. In the articles of Captain
Bartholomew Roberts it is stated: “The Musikers to have Rest on the
Sabbath Day, but the other six Days and Nights, none without special
Favour.” When thinking about the musicians on board a ship in the 16th
to 18th centuries, one must not think of a band. That would be far too
organized a concept. There is no way to know how many crew members may
have been musicians, but one assumes that the number is not large.
It is likely that ships of this period had crew members who owned
musical instruments as varied as brass horns, mouth harps, fiddles, bag
pipes and accordions. Furthermore, sailors could gather numerous
instruments from the various ports of call their ship made. Examples
here are numerous: cowhide and goatskin drums from Africa, dried gourd
maracas from Cuba, bamboo drums and flutes from Hispaniola, and even
tambourines from Morocco. Pause a moment and consider the combined
sounds of all of the instruments mentioned here. Now you know why a band
is not the idea you want to have. The musicians were popular with the
crew, as they were entertainment as well as a valuable battle element.
The musicians played during meal times and during work breaks allowing
the crew some entertainment to break the monotony of long hours of
tiring work. This boost in moral was welcome at anytime, but was perhaps
the most effective when used in battle.
From stories of Bartholomew Roberts crew and others, we know that
when a ship with musicians approached another ship with the intention to
fight, the effects of the music could be terrifying to the enemy. The
musicians would play marches and other martial music. There were drum
rolls, trumpet and bugle calls, and perhaps even a piper given the
nationality of the crew. Add to this the noise of the ship’s cook
beating upon his pots and pans and the crew stamping their feet or
beating their weapons against the ship. Finally top this off with the
sounds of shouting, screaming, and shooting, both pistols and rifles as
well as cannons and deck guns. Your imagination can supply you with the
details of the scene. The intended result is achieved: the morale aboard
the pirate vessel is raised to a fevered pitch while the morale of
their intended prize is shaken. So do not forget that pirates and
privateers know the value of bardic inspiration when you run those
encounters.
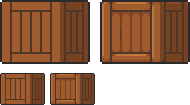
Texturing is a technique that involves
adding local shading and details on surfaces to better represent the
material of an object.
This technique is of course closely linked to shading in general. This is usually applied after defining a global shading.
From left to right :
Lineart
Global shading
Completed sprite
One of the big differences between global and local shading is homogeneity. The
very principle of global shading is to give a sufficiently contrasting
effect between the shaded and lit areas to bring out volume and depth.
Conversely,
a texture must be as homogeneous as possible. It must be able to be
applied on large, uniform surfaces, without making it look bad.
2. Applying a texture
A
texture being homogeneous in terms of its luminosity/contrast, if it is
applied to an object without taking into account the global shading, we
will lose any effect of volume and depth.
A texture applied to a sphere without shading. Only the deformation of the texture can give us a clue on the shape of the object, but it is still difficult to discern.
Homogeneous contrast
When applying a texture to an object, shadows must also be taken into account. It
is therefore important to maintain a uniform contrast between colours. A
dark line separating a light zone from a dark zone should not keep the
same colour between these two zones.
The color of the line will be lighter on the lighter side and darker on
the darker side to preserve its contrast with the background.
In
the same way it is possible to apply a texture or pattern on a shaded
object, by proceeding to a simple color shifting in our palette.
Combination of a texture (left) and an object that is not textured but shaded (middle).
3. Local shading
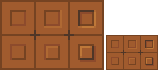
Since shading is used to highlight the bumps, there are generally two possible cases:
A groove
A bump
Each of these cases can be more or less accentuated by playing on the colors, the intensity of shadows and lights.
On the upper line, troughs ranging from the weakest to the strongest bumps. On the second line, these are bumps that stand out.
The
mastery of these light bumps is very important, it is the basis of the
textures, and will make it possible to manage all the simple cases, such
as wood or matte plastic.
Example of application on a simple object:
4. Reflections
The application of a reflection is done in a
simple way, by applying diagonal strips of light of varying
thicknesses, and following a few rules.
A trough or bump will create an offset at the reflection level (proportional to the height change). As
for the shadows, there is no absolute, depending on the palette or the
material represented, it is possible to lighten or not the area at the
reflection level. It is also important not to have parallel light bands on faces that are not oriented in the same direction, as on this cube:
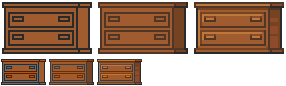
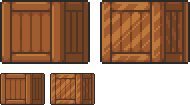
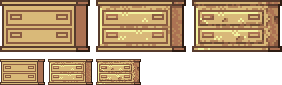
Concrete example of the application of a gold texture on our drawers:
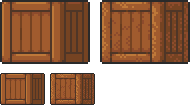
Or, added reflections on our previous crate:
5. Dithering and granularity
Dithering consists in
creating a new false color from a checkerboard or other regular pattern
of two colors close enough to give an illusion of mixing. The closer
the colours are, the stronger the illusion will be. The more the colours
are contrasted, the stronger the granularity effect will be.
Dithering is basically used to obtain fake intermediate shades on
limited palettes, but it is also very useful for making complex and
rough textures.
Example of complex dithering separating 3 colors over a wide area.
The nature of the pattern totally changes the roughness aspect.
Example of the application of a sandy rock on our drawers:
Or add grain to our crate:
6. The art of destruction
The more complex a texture is, the more it will combine fundamental techniques such as bumpiness, reflections or granularity. However, some materials need to go further, by cutting, slash or breaking the base support.
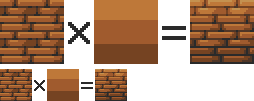
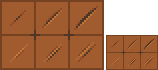
Cuts It works much like bump, but on a much finer surface. We are subject to the same rules, of which here is a summary image:
From the finest to the most pronounced, on the first line of the cuts, and on the second of the bumps.
A concrete example on our crate:
Exercises
Since nothing beats practice to learn, here is a series of examples from the simplest to the most complicated.
For each exercise resolved, post your results.
Mastering tools
Add
a strong bump on the text of this image, except the ‘x’ which must be a
groove (the center must be dug more strongly than the rest of the ‘x’):
Palette:
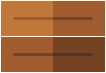
Add reflections on the image obtained between the two red lines shown below:
Now cut and break the letter ‘e’ as well as possible.
Add grain to the letter ‘l’.
Finalize a sprite
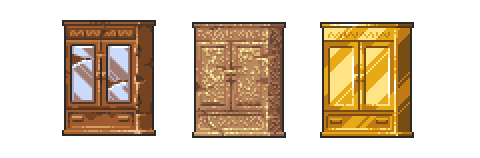
Texturize/colorize this sprite:
Palette:
Add reflections on the inside of the doors to give the impression that there are windows.
Add damage (cuts etc) on the right side of the wardrobe.
Make a variant of this cabinet by redoing it in gold using the palette of the gold drawers example in the tutorial. Palette:
Texturing is a technique that involves
adding local shading and details on surfaces to better represent the
material of an object.
This technique is of course closely linked to shading in general. This is usually applied after defining a global shading.
From left to right :
Lineart
Global shading
Completed sprite
One of the big differences between global and local shading is homogeneity. The
very principle of global shading is to give a sufficiently contrasting
effect between the shaded and lit areas to bring out volume and depth.
Conversely,
a texture must be as homogeneous as possible. It must be able to be
applied on large, uniform surfaces, without making it look bad.
2. Applying a texture
A
texture being homogeneous in terms of its luminosity/contrast, if it is
applied to an object without taking into account the global shading, we
will lose any effect of volume and depth.
A texture applied to a sphere without shading. Only the deformation of the texture can give us a clue on the shape of the object, but it is still difficult to discern.
Homogeneous contrast
When applying a texture to an object, shadows must also be taken into account. It
is therefore important to maintain a uniform contrast between colours. A
dark line separating a light zone from a dark zone should not keep the
same colour between these two zones.
The color of the line will be lighter on the lighter side and darker on
the darker side to preserve its contrast with the background.
In
the same way it is possible to apply a texture or pattern on a shaded
object, by proceeding to a simple color shifting in our palette.
Combination of a texture (left) and an object that is not textured but shaded (middle).
3. Local shading
Since shading is used to highlight the bumps, there are generally two possible cases:
A groove
A bump
Each of these cases can be more or less accentuated by playing on the colors, the intensity of shadows and lights.
On the upper line, troughs ranging from the weakest to the strongest bumps. On the second line, these are bumps that stand out.
The
mastery of these light bumps is very important, it is the basis of the
textures, and will make it possible to manage all the simple cases, such
as wood or matte plastic.
Example of application on a simple object:
4. Reflections
The application of a reflection is done in a
simple way, by applying diagonal strips of light of varying
thicknesses, and following a few rules.
A trough or bump will create an offset at the reflection level (proportional to the height change). As
for the shadows, there is no absolute, depending on the palette or the
material represented, it is possible to lighten or not the area at the
reflection level. It is also important not to have parallel light bands on faces that are not oriented in the same direction, as on this cube:
Concrete example of the application of a gold texture on our drawers:
Or, added reflections on our previous crate:
5. Dithering and granularity
Dithering consists in
creating a new false color from a checkerboard or other regular pattern
of two colors close enough to give an illusion of mixing. The closer
the colours are, the stronger the illusion will be. The more the colours
are contrasted, the stronger the granularity effect will be.
Dithering is basically used to obtain fake intermediate shades on
limited palettes, but it is also very useful for making complex and
rough textures.
Example of complex dithering separating 3 colors over a wide area.
The nature of the pattern totally changes the roughness aspect.
Example of the application of a sandy rock on our drawers:
Or add grain to our crate:
6. The art of destruction
The more complex a texture is, the more it will combine fundamental techniques such as bumpiness, reflections or granularity. However, some materials need to go further, by cutting, slash or breaking the base support.
Cuts It works much like bump, but on a much finer surface. We are subject to the same rules, of which here is a summary image:
From the finest to the most pronounced, on the first line of the cuts, and on the second of the bumps.
A concrete example on our crate:
Exercises
Since nothing beats practice to learn, here is a series of examples from the simplest to the most complicated.
For each exercise resolved, post your results.
Mastering tools
Add
a strong bump on the text of this image, except the ‘x’ which must be a
groove (the center must be dug more strongly than the rest of the ‘x’):
Palette:
Add reflections on the image obtained between the two red lines shown below:
Now cut and break the letter ‘e’ as well as possible.
Add grain to the letter ‘l’.
Finalize a sprite
Texturize/colorize this sprite:
Palette:
Add reflections on the inside of the doors to give the impression that there are windows.
Add damage (cuts etc) on the right side of the wardrobe.
Make a variant of this cabinet by redoing it in gold using the palette of the gold drawers example in the tutorial. Palette:
Fun family story: when my aunt was marrying her wife everyone was really excited but also dreading it because my aunt is known for her insanely long speeches so everyone knew her vows would be like 9 hours long so when it came time for her to say her vows she had a shit ton of cue cards in her hands and even her wife started groaning and my aunt took a deep inhale and then unravelled all the cue cards which were taped together and they all just read ‘HOT DAMN’ in giant letters and those were my aunts vows.
I got fixated on the concept of Xion’s final form as an au where she’s a dragon. But to be honest I was most interested in drawing Namine smooching her… as a dragon


